Hanging Pictures
Just about everyone who gets an RV wants to personalize it and make it their special home (or home away from home). This usually means adding family pictures or other pictures that have special meaning for them.
The problem faced by all RVers is the very thin walls (usually only 1/8" plywood) found in all RVs. There is just not enough thickness to securely put even a small nail or regular picture hanger in the wall and expect the pictures (or mirrors) to stay on the walls as you travel down the road over bumps, curves, and often just plain crappy roads.
But, rejoice RVers, there is a way to securely fasten your pictures and mirrors so that they will still be on the wall when you arrive at your next camp site—flush mount hangers.
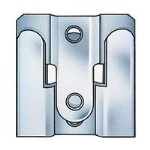
Years ago I happened to find special metal hangers that are two interlocking pieces— one part screws to the wall and the other part screws to the back of the picture or mirror that you wish to hang. I find that the smallest ones, 1" x 1" in size work best for most pictures.
If you are lucky, you might find these hangers at "some" Home Depots or "some" Lowes. More recently, I have found that "some" of the True Value hardware stores also carry these very useful hangers. However, you need to be aware that some hardware stores only carry the larger size flush mount hangers (1 3/4" x 1 3/4") which are much too large for most uses in a motorhome or fifth wheel trailer.
Take your time and measure carefully to get your hangers correctly located on your wall and the picture frame. The small size and close thread spacing of the included screws make them easy to install, and they also seem to hold in the thin plywood walls.
After installing two hangers for every picture (so they won't tend to wobble back and forth), you install the mating halves of the connectors on the back of the picture or mirror. When the picture is properly hung, the two parts of the hanger interlock (and overlap by about 1/2"), so the pictures cannot bounce off the hangers.
Next, take very short pieces of Velcro (I use 3/8" wide Velcro and cut pieces about 1" long) and place a short piece of Velcro at each bottom corner of the picture. Obviously, one part of the Velcro goes on the wall and the mating piece goes on the back of the picture frame.
The combination of the special hangers and the Velcro strips on the bottom prevent the picture from bouncing off the wall, and the Velcro strips also keep the picture frame against the wall so that it is not bouncing away from the wall on the bottom.
This type of picture and mirror hanging has survived (and has served us well) for many years—and has endured the rigors of rough BC and Alaska roads without any problems at all.
When we decided to move the large mirror in our motorhome's bedroom, so that we could hang some special pictures next to it, we discovered that Winnebago had used the exact same hanging arrangement that we had been using for many years. However, they had used a very strong style of Velcro that had a tenacious grip. It took a lot of effort to pry the mirror off the wall.
Take a little extra time and effort to install your pictures and mirrors, and you will not have a problem with them falling off the walls as you travel down the road.