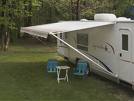
Awnings
Now that the important steps of setting up your RV at the camp site have been accomplished, there are a few more things that you may wish to do to make your camping experience a little more pleasant. Let's start by putting out the awnings.
Large Main Awning.

It is now time to unfurl your large awning (often referred to as the patio awning) that is on the right side (or curb side) of your RV. Different awning manufacturers have different ways of securing the awning for travel. Most awnings are manually operated, but some of the bigger and more expensive coaches have electrically operated awnings.
Lets assume that your awning (like most RVers) is a manual one. You will need to loosen one round handle on each awning arm, and then release the travel catch that is “supposed” to keep the awning arms from opening while you are traveling down the road. Once the travel latches have been released, then find your awning hook (that long rod with an L-shaped end) . At the front end of the awning, reach up to the front of the roller and, using the awning hook, pull down on the small latch that controls the rotational direction of the awning. Once the latch has been pulled to the down position, then take the awning hook and go to the center of your awning. You will see a loop or strap hanging down a wee bit from the center. Use the awning hook to pull on the strap, and your awning will unfurl. Pull on the strap until the awning is fully deployed.
The next step is to extend the arm supports on the end. Once the arms have been extended out to the end of the awning arms, pull down on one awning arm until the awning fabric seems to be tight, then tighten the black knob on the awning arm. Repeat this process on the other end of the awning, so that both arms have been snugged down and the awning is fairly tight (without very much flap). At this point, some campers choose to add awning “deflappers” between the middle of each awning arm and the middle side of the awning fabric itself. These look much like plastic or metal clamps that are intended to keep the center "sides" of the awning from moving too much in a stiff breeze. The best advice, however, is to put your awning away (stow it) if the wind kicks up enough to start buffeting the RV.
The last step is to raise both ends of the awning so that it is at the height where you want it—keeping out most of the sun but not blocking your view. However, this is a critical step, because many campers put their awning up with both ends of it at the same height—and this is a “no-no”. Putting up an awning this way makes the awning a perfect catch basin for any rain that may fall. Experienced campers always put one end of the awning a couple of inches lower than the other end. When the awning fabric is stretched tight and sloped to one end, the awning will shed rain water rather than collecting it.
It really goes without saying that the last step is to drag your awning strap from the center of the roller tube to one end or the other. Then wrap the strap around one of the awning arms to get it out of the way.
Small Window Awnings.

The smaller awnings that many RVs have on some of their windows are very easy to set up. Simply take your awning hook, catch the strap in the center of the awning, and pull down until you can grab the strap with your hand.
Most campers simply slide the strap through the mounting hook below the bottom of the window and leave the strap straight (without a twist). This method works just fine, except that when a stiff wind crops up, your RV is going to start playing a tune! (The tight straps act like violin strings and often begin to “sing.”)
 The way to cure the unwanted melody of singing awning straps is to give each
strap a half twist before you attach it to the hook at the bottom of the window.
